Layer 1 of 7 — you are here
Day One · Companion to Chapter 4
The Network Wall
Day One is the biggest win of the week: one wall that covers every device in the house at once — including the ones you can't install anything on, like the smart TV and the kid's friend's phone on your Wi-Fi. We do it by changing which DNS service your network uses. DNS is the internet's phone book; a family-safety DNS service is a phone book with the bad neighborhoods torn out.
What I run: NextDNS
I run NextDNS at home. It's not the only good option, but it's the one this page walks through, because I can only vouch for what I've actually lived with. The free tier includes 300,000 DNS queries a month — enough for many households — and if you blow past it, NextDNS keeps resolving but stops filtering until the month rolls over (one more reason the monthly test in maintenance matters). The paid tier removes the limit: $1.99/month or $19.90/year.
Worth saying plainly, because it's why this system looks the way it does: when I was designing our setup, the options on the table ran from $200–300 filtering routers down to mid-tier boxes with subscriptions. The goal was always as effective as possible, as cheap as possible — and NextDNS won on both. Twenty bucks a year was a risk I was willing to take to see if this would work. It did. Everything else in the seven layers uses tools you already own.
Alternatives worth knowing
| Service | What distinguishes it |
|---|---|
| NextDNS | Deep per-category control, per-device analytics, scheduling ("Recreation Time"), bypass-method blocking. What this site assumes. |
| CleanBrowsing | Simple fixed filter tiers (Family / Adult / Security). Less to configure, less to configure wrong. |
| Cloudflare for Families (1.1.1.3) | Free, zero-account setup — just point your router at the addresses. Malware + adult blocking only; no customization, no scheduling. |
| OpenDNS FamilyShield / Home | The veteran. FamilyShield is preconfigured; Home adds category choices with a free account. |
| Control D | NextDNS's closest feature rival: per-profile scheduling and up to ten per-device profiles, $3–6/month. |
Any of these beats nothing. The rest of this page assumes NextDNS; if you chose another service, the router steps are identical — only the addresses you enter differ.
Step 1 — Create your NextDNS configuration
- Go to nextdns.io and create an account. Use a parent-only email address — this login is a wall key (see Layer 6).
- NextDNS creates a configuration with a short ID (six characters, letters and numbers). This ID is your household's filter. Treat it like a password: anyone who has it can read your DNS logs, and anyone who can log in can turn the wall off.
- Note the Setup tab: it shows the two DNS server addresses plus your configuration's unique DNS-over-TLS/HTTPS hostnames. You'll need these for the router.
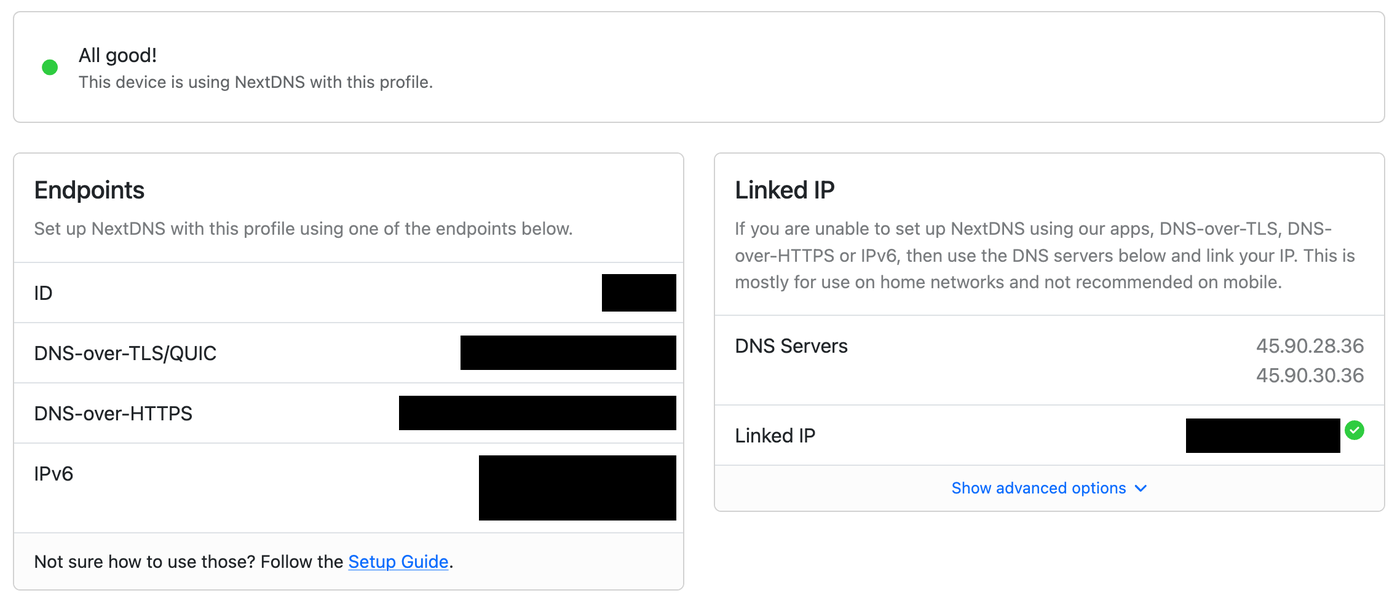
Step 2 — The starting profile
In the NextDNS dashboard, work through these tabs. This is the profile I recommend every family start with — you can loosen individual categories later, deliberately, when a real need shows up.
Parental Control tab
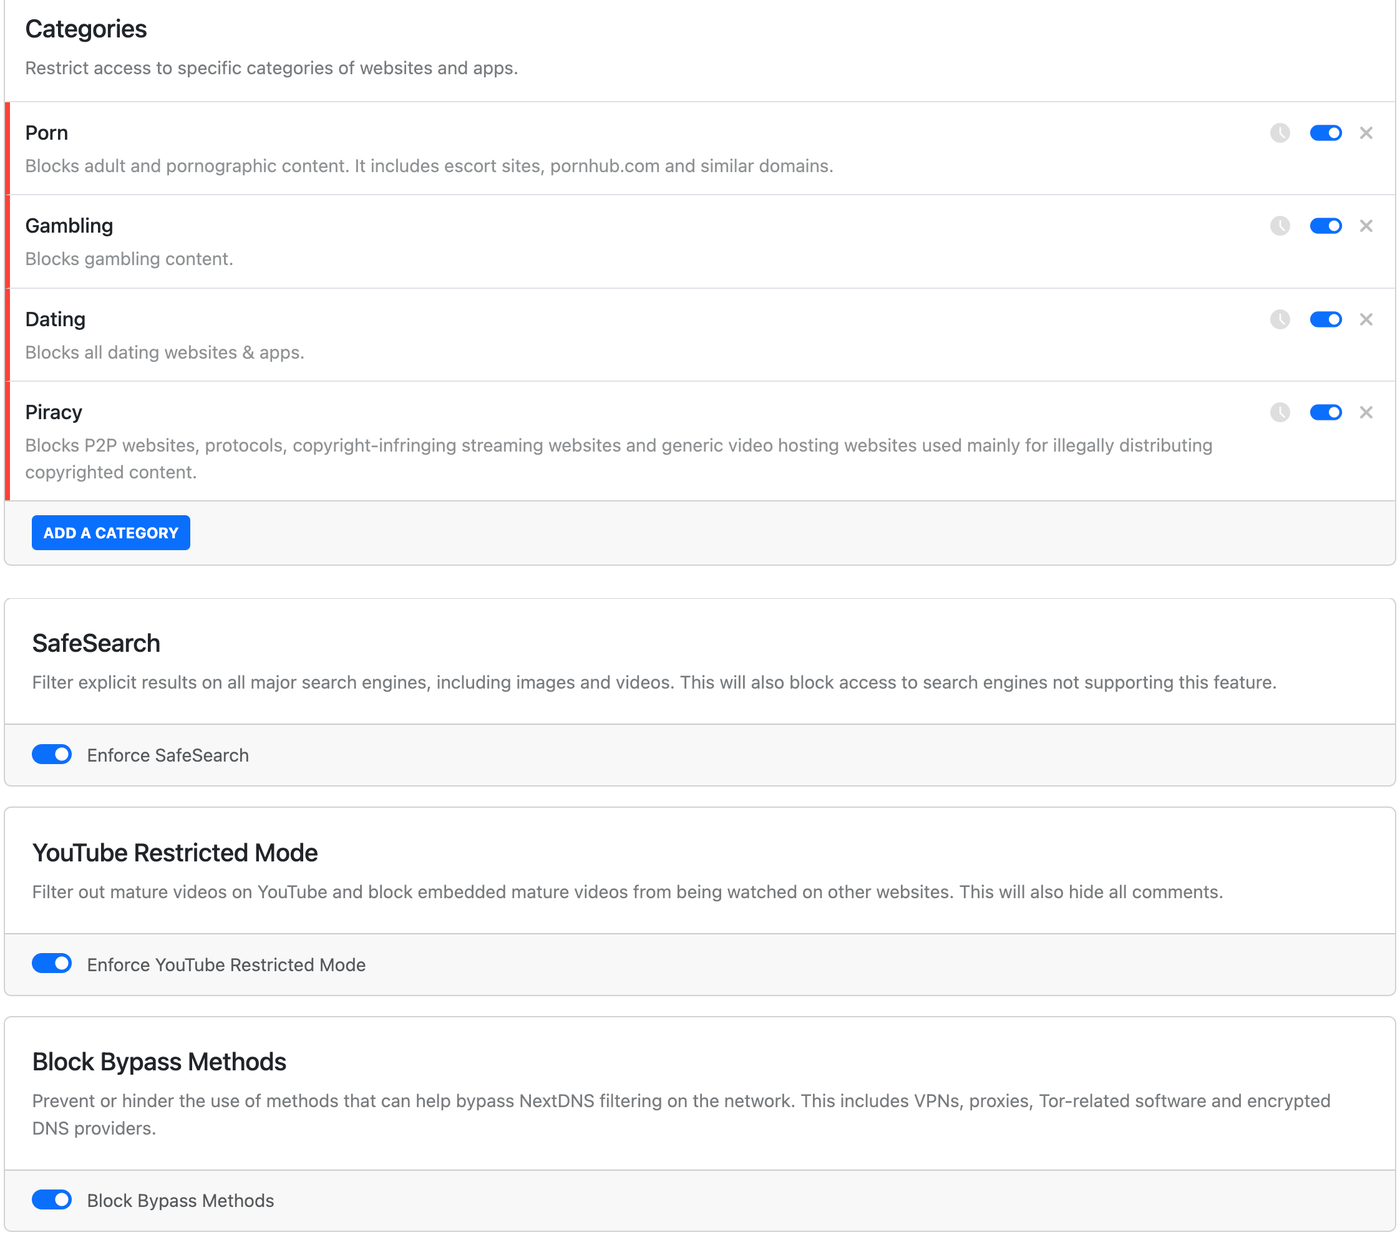
- Block these categories at minimum: Porn (that's the dashboard's actual label), Gambling, Dating, Piracy. Add others (e.g., Social Networks per-schedule) only after the base wall works.
- Enforce SafeSearch — forces Google and Bing into their filtered modes at the network level, so it can't be toggled off in the browser.
- Enforce YouTube Restricted Mode — same idea for YouTube. Note: Restricted Mode is blunt. It will over-block some legitimate content. That's the trade at this layer; device-level YouTube controls in Layer 3 are finer-grained.
- Block Bypass Methods — this is the big one people miss. It blocks known VPN services, proxies, and encrypted-DNS providers that exist specifically to walk around walls like yours. Turn it on.
Security tab
- Leave the default threat protections on (malware, phishing, typosquatting). They're not parental controls, but there's no reason to turn them off.
Step 3 — Point your router at it
You change DNS once, at the router, and every device on your Wi-Fi inherits the wall. The generic recipe, then brand notes.
Generic (any router)
- Log in to your router's admin page. It's usually at
192.168.1.1or192.168.0.1in a browser; the address and default password are printed on the router's label. (Changing that default password is a Layer 6 task — flag it now.) - Find the DNS settings. They hide under names like Internet, WAN, DHCP, or Advanced → DNS.
- Replace the automatic/ISP DNS entries with the two addresses from your NextDNS Setup tab.
- Save and reboot the router if prompted.
- Link your IP (Step 4 below) — do not skip this.
Brand notes
Menus move; these were the paths at the "Last verified" date above. If yours differs, the generic recipe still applies — you're just hunting for the DNS fields.
| Brand | Where DNS lives |
|---|---|
| Netgear | routerlogin.net → Internet → Domain Name Server (DNS) Address → "Use These DNS Servers" |
| TP-Link | tplinkwifi.net → Advanced → Network → Internet → Advanced Settings → "Use the following DNS addresses" (LAN-side alternative: Network → DHCP Server) |
| ASUS | router.asus.com → WAN → Internet Connection → WAN DNS Setting → set "Connect to DNS server automatically" to No |
| Linksys | Linksys app → Menu → Advanced Settings → Local Network Settings → DNS Settings → Manual (web admin at 192.168.1.1 works too) |
| eero | eero app → Settings → Advanced networking → DNS → Custom DNS. Note: if any eero Plus filter is on (Advanced Security, Ad Blocking, Content Filters), the DNS fields grey out — turn those off first. It's one filtering system or the other, not both. |
| Google Nest Wifi / Google Wifi | No web admin page — settings live in the Google Home app: Wi-Fi → Settings (gear) → Advanced networking → DNS → Custom. Mesh systems generally: the app is the router. |
Step 4 — Verify. Then verify again.
A wall you haven't pushed on is a wall you're imagining. Three tests, in order, on a device connected to your Wi-Fi:
- The service's own test page. For NextDNS, visit test.nextdns.io — it should report that the device is using NextDNS, with your configuration ID. Other services have equivalents.
- The dummy test sites. Cloudflare publicly documents two harmless test domains that filtering services categorize as if they were real:
nudity.testcategory.comandmalware.testcategory.com. Visiting them is the safe way to test your wall without visiting actual content. Both should be blocked. (Both domains are live and documented in Cloudflare's official docs as of the verification date above.) - A real search. Google something spicy-adjacent and confirm SafeSearch is locked on (Google's settings page will show it as forced by your network).
The re-link fix — read this twice
Here's why: when your router talks to NextDNS over plain DNS (the two IP addresses you entered), NextDNS identifies your house by your public IP address — the "Linked IP" on the Setup tab. Most home ISPs reassign that address occasionally: after a modem reboot, an outage, or just because. When it changes, your traffic no longer matches your configuration, and you silently fall back to unfiltered DNS.
- The manual fix: log in to the NextDNS dashboard → Setup tab → find the Linked IP section → click Link IP (it re-associates your current address). Takes ten seconds.
- Make it a habit: this is the first item of the Monthly Five. First Saturday of the month, re-link before you test.
- Or automate it: NextDNS gives every configuration a unique update URL on the Setup tab (it looks like
link-ip.nextdns.io/yourconfig/…) — visiting it from your home connection re-links automatically. Some routers can call it on a schedule via their DDNS/custom-URL field; an always-on computer can do the same with a scheduled job. Better still: routers that support DNS-over-TLS/DNS-over-HTTPS can skip IP-linking entirely by using your configuration's unique encrypted-DNS hostname. If yours supports it, use it — it's the permanent fix.
What this layer doesn't cover
The network wall only guards your home Wi-Fi. The phone walks out the door onto cellular every day — that's the "traveling wall" in Layer 3. And the wall can't see inside apps that bring their own content, which is why Layer 4 exists. One layer per day. Tomorrow: accounts.